Version control with Git
If you ever started commenting old code “just in case” it turns out to be useful one day in the future,
or if you think that sharing a code base between several people is a headache…
you need to start using version control. Git is one of the most popular options, and
it is the one we use to develop lartpc_mlreco3d.
Git basics
The jargon
- Repository (repo in short)
the folder that hosts all of your library / code is called a repository.
- Local vs remote repository
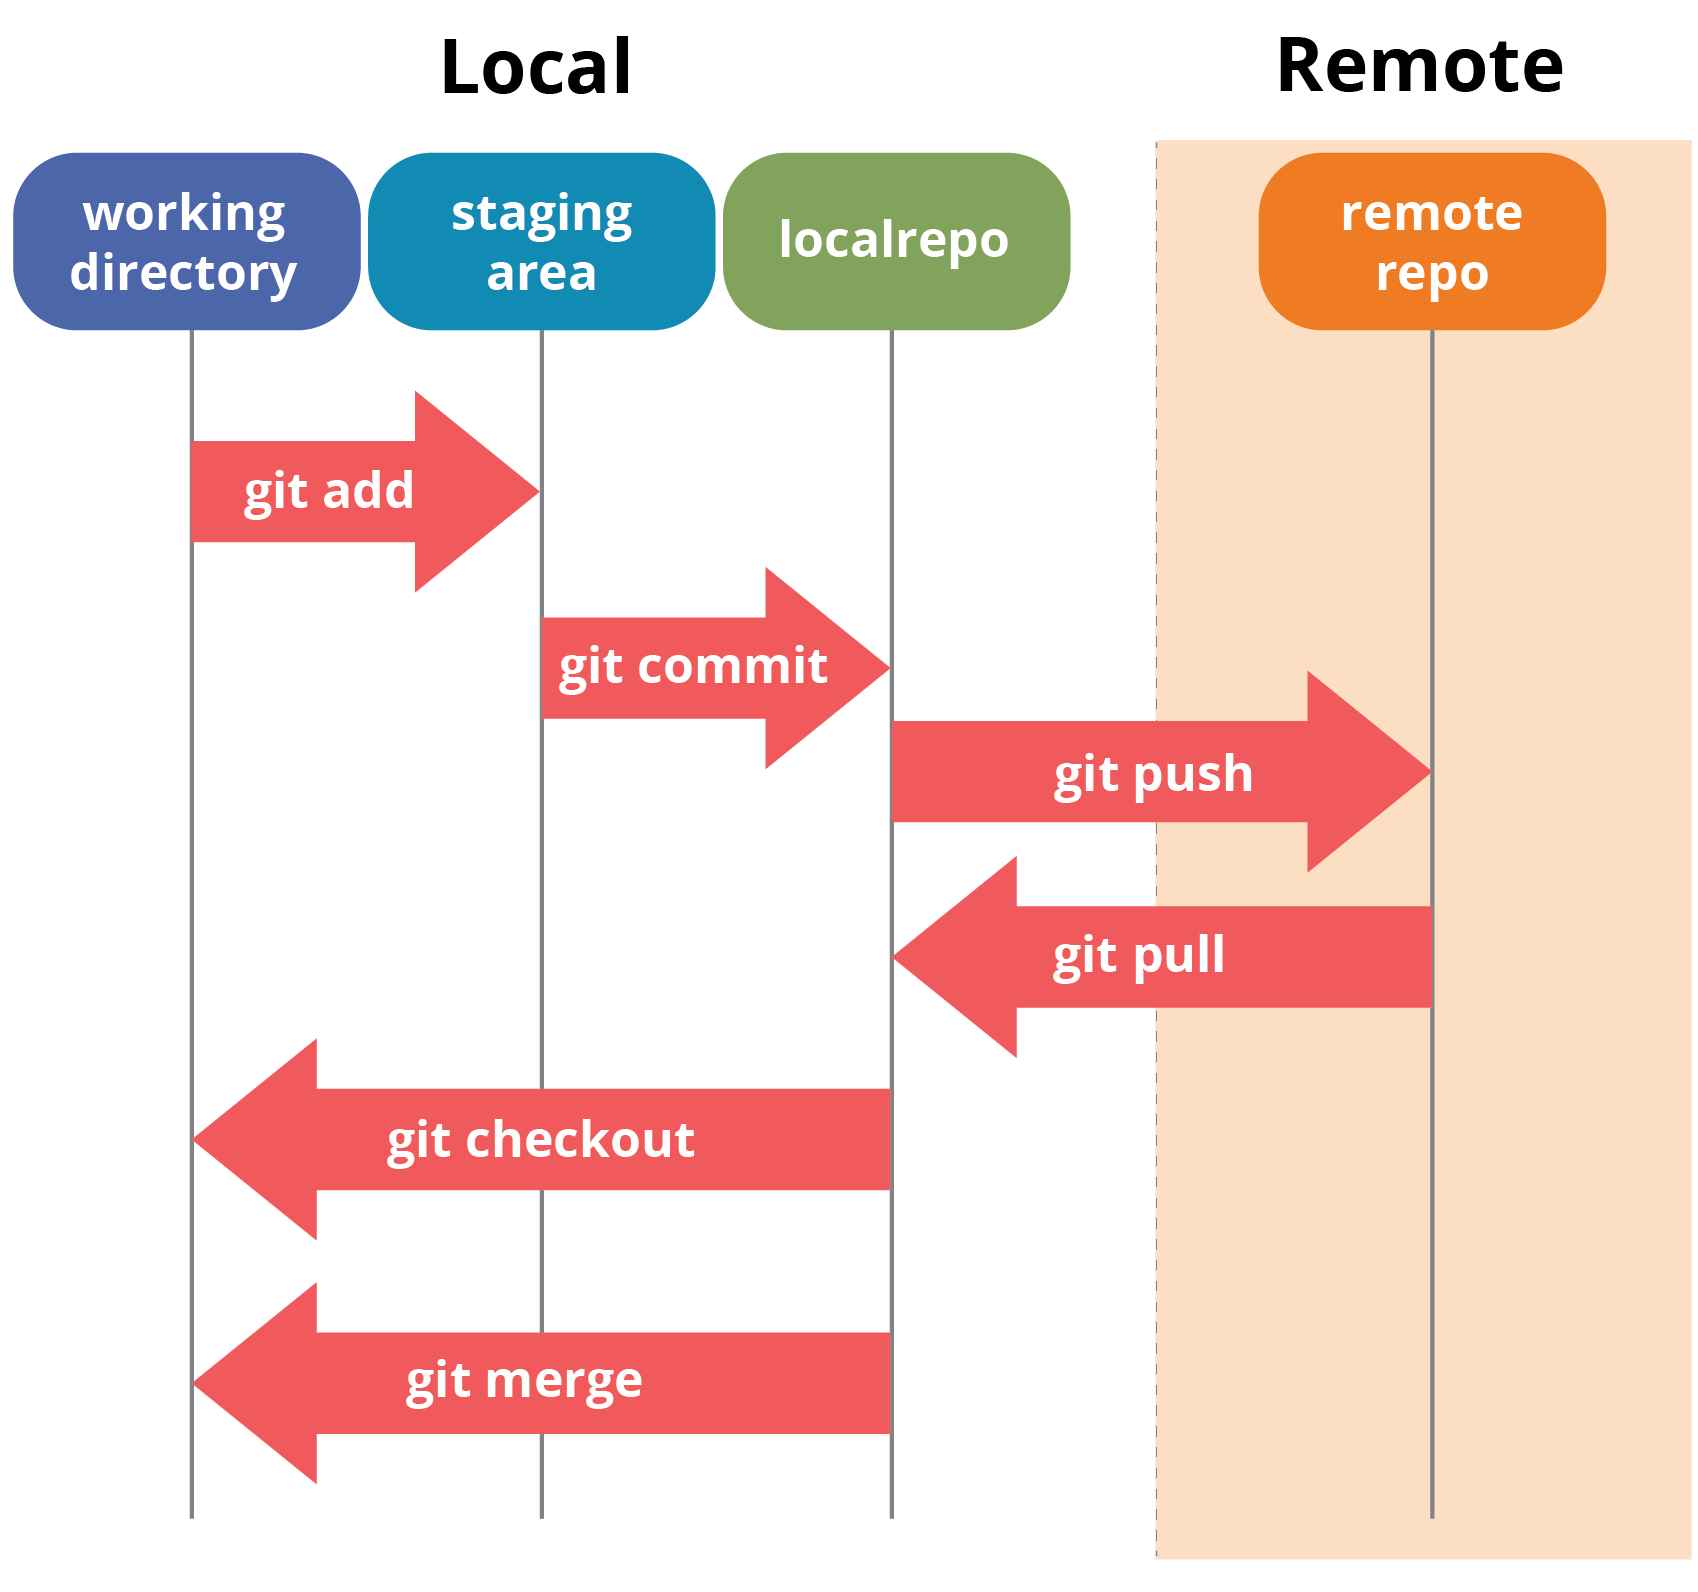
although it is not necessary, usually repositories are hosted on a website such as Github. The repository exists in Github (remote) and on your computer or local machine (local). You can start with a local repository that you use later to create the remote repository, or you can clone the remote repository onto your local machine and start working locally.
- Staging area
when you are happy with changes that you made in your working directory, you put the files that you want to be tracked in the so-called staging area. This lets Git know which files to look at to make its snapshot of the code changes.
- Commit
a snapshot of the changes that you made since the last commit. Git is smart enough to only save the differences. Each commit is identified with a unique hash number that looks like
a97931de9e0be8de3b2910c3339bf29e01ca6fdc.

Fig. 1 How Git works in a nutshell. Credit: Edureka.
Note
All the git commands start with git xxx where xxx is the operation you are trying to perform (add, commit, etc).
       git


       status
When you want to see which files have changes, which files are in the staging area ready to be committed:
Singularity> git status
On branch master
Your branch is up to date with 'origin/master'.
Changes not staged for commit:
(use "git add <file>..." to update what will be committed)
(use "git checkout -- <file>..." to discard changes in working directory)
modified: _toc.yml
Untracked files:
(use "git add <file>..." to include in what will be committed)
.ipynb_checkpoints/
no changes added to commit (use "git add" and/or "git commit -a")
       git


       add
When you want to add files to be part of the next commit.
Use git add -u to add all changed files that are tracked (i.e. were part of a previous commit).
Use git add your_file to add a new file to the staging area.
       git


       commit
Will take all files in the staging area, compute the changes and store them in a commit.
You have to give a title to your commit. Use git commit -m "your_message" to go fast.
If you have more to say than can be said in a title, you optionally can write a whole text
body to your commit. Just use git commit and it will open a text editor for you. Write your
message, save and exit to complete the commit.
       git


       log
Will show you the history of commits.
Working with branches
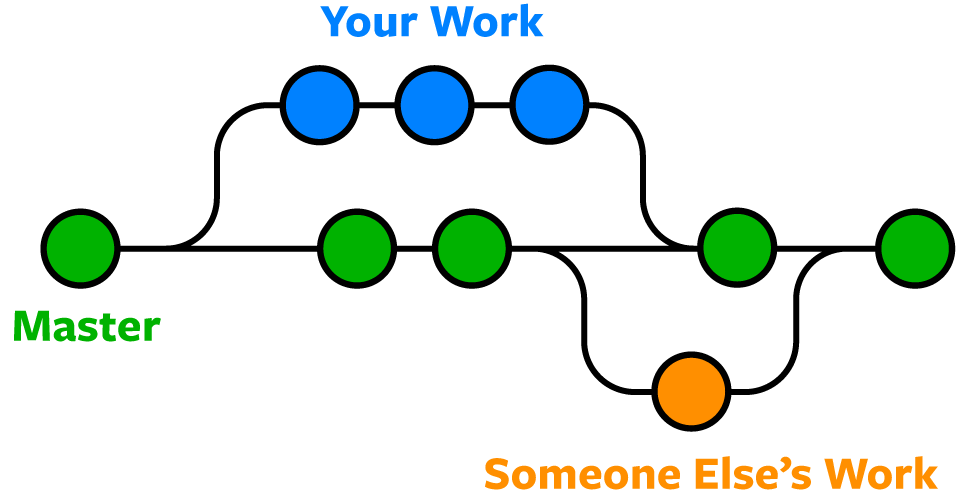
Branches allow you to develop in parallel several versions of the same codebase, and to merge them seamlessly when you decide to. For example, if you want to work on an experimental feature that might break everything, it is easier to fork from the code base, create a new branch and develop the feature there. It allows you to keep evolving the code base in a stable way, fixing minor bugs, sharing with collaborators etc. When your feature is ready then you can merge it back, and voila !

Fig. 2 Each circle is a commit. Credit: nobledesktop.com
       git


       checkout
Extremely useful command that allows you to navigate between branches and commits.
git checkout -b my_new_branch will create a new branch called my_new_branch.
git checkout existing_branch will switch the code in your folder to the branch existing_branch.
git checkout a97931de9e0be8de3b2910c3339bf29e01ca6fdc will switch to the commit whose hash code you provided.
       git


       merge
When you are ready, you can merge a branch (local or remote branch) into your current branch.
Use git merge other_branch to merge other_branch into the current one.
If everything is clear to Git, it will proceed to make the merge automatically. There might however be merge conflicts which happen when something is ambiguous and Git is unsure which version of the code to keep in a file. It will tell you which files have merge conflicts, and you have to manually open the file, find the problematic code blocks that have been highlighted by Git, and erase what you do not want to keep.
Working with remote repositories
       git


       clone
You want to use an existing repository? You need its Git URL.
In Github, you click on the green Code button to get the repository URL.
It will look something like this: https://github.com/DeepLearnPhysics/lartpc_mlreco3d_tutorials.git
Then you do git clone YOUR_URL. This will clone the remote repository into a new folder in your current working directory.
       git


       remote


       -v
See the list of remote repositories, their names and their URLs.
By default, if you cloned a repository, it will appear here under the default name of origin.
       git


       fetch


       origin
This will download the latest changes from the remote repository called origin, but will not
attempt to merge them yet.
       git


       pull


       origin
Oh, useful command! This will fetch the latest changes from the remote repository (assuming it is called origin as usual) and
attempt to merge them with the current branch.
       git


       push


       origin


       master
This will push your changes (commits) from the branch master to the remote repository called origin.
Read more
https://learngitbranching.js.org/ or how to learn Git branching through an online game
https://git-scm.com/book/en/v2 Pro Git book
